How To Build A Gaming Pc Nowadays? [Easy Step-by-Step Guide]
Building a gaming PC is a unique opportunity to create a machine tailored to your exact needs. It’s a project that, while requiring attention to detail and a bit of patience, rewards you with a system that reflects your preferences and gaming ambitions. From selecting the perfect components to assembling them into a powerhouse, this guide walks you through every step, ensuring your build is both successful and satisfying.
Related: How Much Does A Gaming Pc Cost? [<year> Latest Insights]
Essential Components For Building A Gaming PC
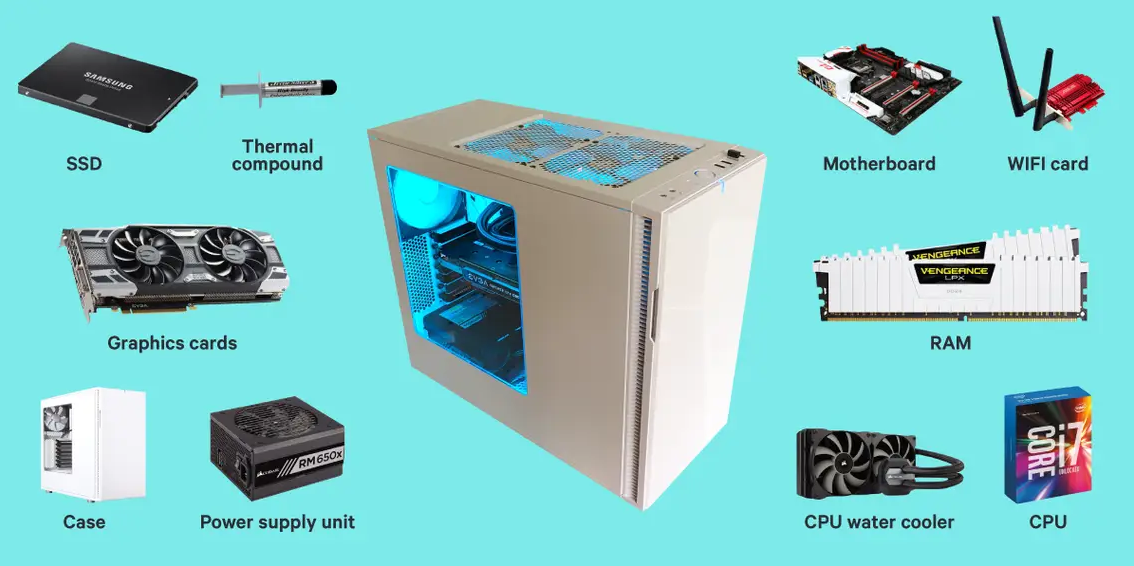
Processor (CPU)
The CPU is the engine of your gaming PC, driving all processing tasks. To ensure optimal gaming performance, look for a CPU with high clock speeds and multiple cores. Intel’s Core i7 and i9 or AMD’s Ryzen 7 and 9 series are excellent choices that strike a balance between performance and value.
Key Considerations:
- Clock Speed:Higher clock speeds generally mean better performance in gaming.
- Cores:More cores allow for better multitasking and handling of complex tasks.
- Compatibility:Ensure your CPU is compatible with your motherboard’s socket.
Graphics Card (GPU)
The GPU is crucial for rendering the visuals in your games. Choosing the right one depends on your gaming needs and budget. For most gamers, a GPU with at least 6GB of VRAM, like NVIDIA’s RTX 3070or AMD’s RX 6700 XT, will provide excellent performance.
Budget-Friendly Tip:Consider last-generation GPUs, which can offer solid performance at a lower cost.
Memory (RAM)
RAM determines how efficiently your PC can handle multiple tasks simultaneously. For gaming, 16GB of RAM is the sweet spot, offering enough headroom for most modern games. Opt for RAM with a speed of at least 3200 MHz to ensure smooth gameplay.
Pro Tip:If you plan on heavy multitasking or streaming, upgrading to 32GB can provide extra performance.
Storage (SSD Vs. HDD)
Fast storage is essential for reducing load times and enhancing the overall responsiveness of your system. An SSD is a must for your primary drive, where the operating system and games will reside. Pair it with a larger HDD for storing media and other files.
Quick Comparison:
- SSD:Faster load times, better overall system responsiveness.
- HDD:More storage for the price, better for bulk storage.
Motherboard
Your motherboard is the hub of your PC, connecting all components and ensuring they work together seamlessly. When choosing a motherboard, look for features like overclocking support, multiple PCIe slots, and built-in Wi-Fi if needed.
Feature Checklist:
- Chipset:Determines compatibility with CPUs and overclocking capabilities.
- Form Factor:ATX is standard, but smaller cases may require Micro-ATX or Mini-ITX.
- Connectivity:Ensure it has enough USB ports, PCIe slots, and M.2 slots for your needs.
Power Supply Unit (PSU)
A reliable PSU is critical for providing stable power to your components. Calculate your power needs based on your components and add a buffer (about 100W) to ensure stability. Choose a PSU with an 80 Plus Gold rating for optimal efficiency.
Tip:Modular PSUs help with cable management by allowing you to use only the cables you need.
Cooling System (Air Vs. Liquid Cooling)
Keeping your PC cool is crucial, especially if you plan to overclock. Air cooling is often sufficient and easier to install, while liquid cooling offers better performance for overclocked systems. Your choice should depend on your performance needs and budget.
Comparison:
- Air Cooling:Easier to install, generally quieter, sufficient for most builds.
- Liquid Cooling:Better cooling efficiency, ideal for high-performance or overclocked systems, but more complex to install.
Case
Your case not only houses your components but also plays a role in cooling and aesthetics. Choose a case that supports good airflow, has enough room for your components, and fits your aesthetic preferences.
Considerations:
- Airflow:Look for cases with good ventilation and space for multiple fans.
- Cable Management:Cases with ample space behind the motherboard tray help keep cables tidy.
- Size:Ensure it fits your motherboard and any large GPUs or coolers you plan to use.
Read Also: What Is A Good Internet Speed For Gaming? [Explained]
Step-by-Step Guide To Assembling Your Gaming PC
Preparing Your Workspace
A clean, organized workspace is key to a successful build. Gather all your tools and components before you start, and consider laying down an anti-static mat to protect your parts.
Tools Needed:
- Phillips-head screwdriver
- Anti-static wrist strap
- Thermal paste (if not pre-applied)
- Cable ties
Installing The CPU
Carefully align the CPU with the motherboard socket and place it gently into position. Secure it by lowering the retention arm. Apply a small amount of thermal paste (if required) in the center of the CPU before attaching the cooler.
Common Pitfall:Ensure the CPU is oriented correctly before applying pressure.
Installing RAM
Open the RAM slots by pushing back the tabs. Align the notch on the RAM with the slot and press down firmly until you hear a click. If using multiple sticks, consult your motherboard manual for the correct slots to use for dual-channel operation.
Installing The Motherboard Into The Case
Place the motherboard inside the case, aligning it with the standoffs. Secure it with screws, then connect the 24-pin ATX power cable and 8-pin CPU power cable from the PSU. Attach the front panel connectors, referring to your motherboard manual for guidance.
Tip:Install the I/O shield in the case before mounting the motherboard.
Installing The GPU
Insert the GPU into the PCIe slot, ensuring it clicks into place. Secure it with screws and connect the necessary power cables. Ensure the GPU is seated correctly and all connections are firm.
Installing Storage (SSD/HDD)
Mount your SSD or HDD in the appropriate drive bay. Secure with screws and connect the SATA data and power cables. If using an NVMe SSD, insert it into the M.2 slot on the motherboard.
Reminder:Ensure you connect the SATA cable to the correct port for optimal performance.
Connecting The Power Supply
Connect the PSU to the motherboard, GPU, and storage drives. Route the cables carefully to avoid obstructing airflow. Secure cables with ties to keep the interior of the case tidy and improve cooling.
Installing The Cooling System
Follow the manufacturer's instructions for installing your cooling solution. For air cooling, mount the fan and heatsink onto the CPU. For liquid cooling, attach the radiator and connect the pump. Ensure all components are securely attached.
Pro Tip:Double-check the orientation of fans to ensure they are set up for optimal airflow.
Final Assembly And Cable Management
With all components installed, focus on cable management. Tidy cables using ties or Velcro straps, ensuring they are routed behind the motherboard tray or along the case edges. A clean build not only looks better but also improves airflow and cooling efficiency.
Initial Setup And BIOS Configuration
Powering On Your PC For The First Time
With everything in place, it’s time to power on your PC. Connect the power cable to the PSU, switch it on, and press the power button on your case. If the system doesn’t boot, revisit your connections and check for any loose cables or improperly seated components.
Accessing And Configuring The BIOS
Enter the BIOS by pressing the designated key (usually Delete or F2) during startup. Confirm that all components are recognized and set your boot drive as the primary boot device. Enable XMP profiles for your RAM to ensure it operates at the correct speed.
Advanced Tip:Explore your motherboard’s fan control settings to optimize cooling performance.
Installing The Operating System And Drivers
Installing Windows/Linux
Insert your installation media and follow the prompts to install your chosen operating system. During setup, create partitions as needed and configure your user preferences. Once the OS is installed, proceed to install drivers.
Installing And Updating Drivers
Download and install the latest drivers for your motherboard, GPU, and other peripherals from the manufacturers' websites. Keeping your drivers updated ensures that your system runs smoothly and can handle the latest games and applications.
Reminder:Prioritize installing the chipset and GPU drivers first, as they are crucial for system performance.
Fine-Tuning And Optimizing Your Gaming PC
Overclocking Your CPU/GPU
Overclocking can push your system beyond its default performance, but it requires caution. Use manufacturer-provided software to gradually increase clock speeds while monitoring temperatures. Ensure your cooling system can handle the additional heat.
Benchmarking And Stress Testing
After overclocking, run benchmarking tools like 3DMark or Cinebench to gauge your system's performance. Stress testing with software like Prime95 or AIDA64 can help identify stability issues. Monitor temperatures closely to avoid overheating.
Installing Essential Gaming Software
Install platforms like Steam, Epic Games Store, and any other software you use for gaming. Consider also installing system monitoring tools like MSI Afterburnerto keep an eye on your system's performance.
Pro Tip:Use a program like CCleanerto keep your system clean and running efficiently.
See Also: What Is Indie Gaming? A Complete Overview
FAQs About Building A Gaming PC
How Much Does It Cost To Build A Gaming PC?
The cost varies depending on your choice of components. A budget build might cost $800-$1000, while a high-end build could exceed $2000. The key is balancing performance with cost.
Can I Build A Gaming PC As A Beginner?
Absolutely. With careful research and patience, even beginners can build a gaming PC. Many resources, including video tutorials and forums, can guide you through the process.
What Tools Do I Need To Build A Gaming PC?
You'll need a Phillips-head screwdriver, anti-static wrist strap, and thermal paste. Additional helpful tools include cable ties for managing cables and a flashlight for visibility inside the case.
How Long Does It Take To Build A Gaming PC?
It typically takes between 2 to 5 hours, depending on your experience and the complexity of your build. Taking your time ensures that everything is done correctly.
Is It Better To Build Or Buy A Pre-built Gaming PC?
Building offers customization and potential savings, while pre-built PCs offer convenience and support. The best option depends on your technical comfort level and desire for customization.
Conclusion
Building a gaming PC is a fulfilling experience that offers deep customization and a sense of accomplishment. By carefully selecting and assembling your components, you not only gain a powerful gaming machine but also the satisfaction of having created it yourself. Enjoy the journey and the incredible gaming experiences that await!